TimeToSignUp Platinum subscribers can create registration forms.
Please note - these are not TimeToSignUp's "sign up sheets" for items in columns. You can read about the differences.
Steps to create a registration form:
- Log in to your TimeToSignUp account.
- Press or hover over the New button at the top of the page, then select Registration Form

Give the form a title. Also you can optionally give instructions or add a comment.

These instructions/comment will appear above the form when a participant views the registration form.
If you need to limit the number of registrations, enter a number for the maximum number of participants. If you do not enter a number, the maximum defaults to 999,999 (we hope that's enough!).

Click Continue Creating Registration Form

When you create a registration form, it has no fields for participants to enter data. Your next step is to add fields. Most likely this is Name, Email Address, Phone Number. You have your choice of what data you want to collect.
Start by clicking Add Field
Design your field using the options that appear on the screen:

Enter a field name. This can be for the participant's name, address, phone number, t-shirt size, age, etc.
If the participant is going to enter text when registering (name, phone number, answering a question), choose Text Box.
If the field is for the participant's email address, change Field Type to Email Address.
If you want to specify choices that will appear in a dropdown menu from which participants can select, choose "Custom Dropdown Menu." You can then enter a list of items that will appear in a dropdown menu when participants are registering. In our example below, the following entries produces a dropdown menu with work options: The dropdown menu that participants would see:
You can make the field required (participant must enter data), optional (participant can leave blank), or hidden (field is not available for participant to enter data).
Select a number for the order in which the field should be displayed on the form. For example, the first field you want to display on the form should have 1, the second field should have 2, etc.
It's nice to have your data sorted when you are viewing the participants. You can alphabetize the data by two of your fields (one primary, one secondary). Usually sign up sheet creators choose their Name (or Last Name) field to be the Primary way to alphabetize registrants.
After you have entered the name, type, required, order and alphabetize options, press Save.

To add additional fields to your form, press Add Field and repeat the process:
If you need to change an existing field's options, click the edit button on the right hand side of its box:

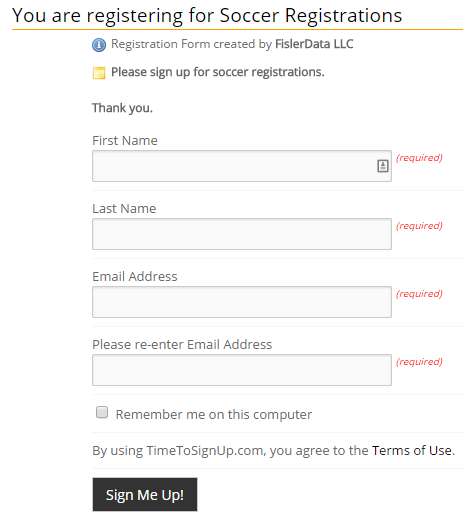
Click View Your Form at the top of the screen to see how your form will look.

When you are logged in and viewing your registration form, you will see admin options.
 Add & Edit Fields allows you to add more fields for participants to enter data, or edit existing fields.
View/Edit Detailed Registrations allows you to see who has signed up on your registration form.
Don't worry - participants will not see these options. You're seeing them because you are logged in as the admin. Participants will see the registration fields.